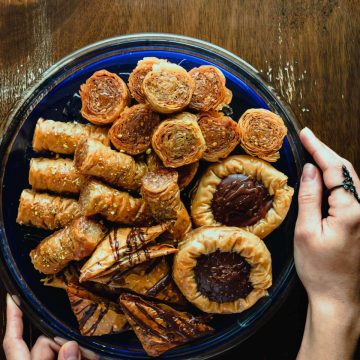
There is nothing better than a big piece of syrup-soaked, crunchy Baklava. Or maybe there is... Like different mini Baklava's. Think of biting into one that's chocolate-y and flaky, one that's extra crunchy, one that's just the size of one bite (pistachio-filled), and one that's like biting into a Baklava-flavored chocolate!
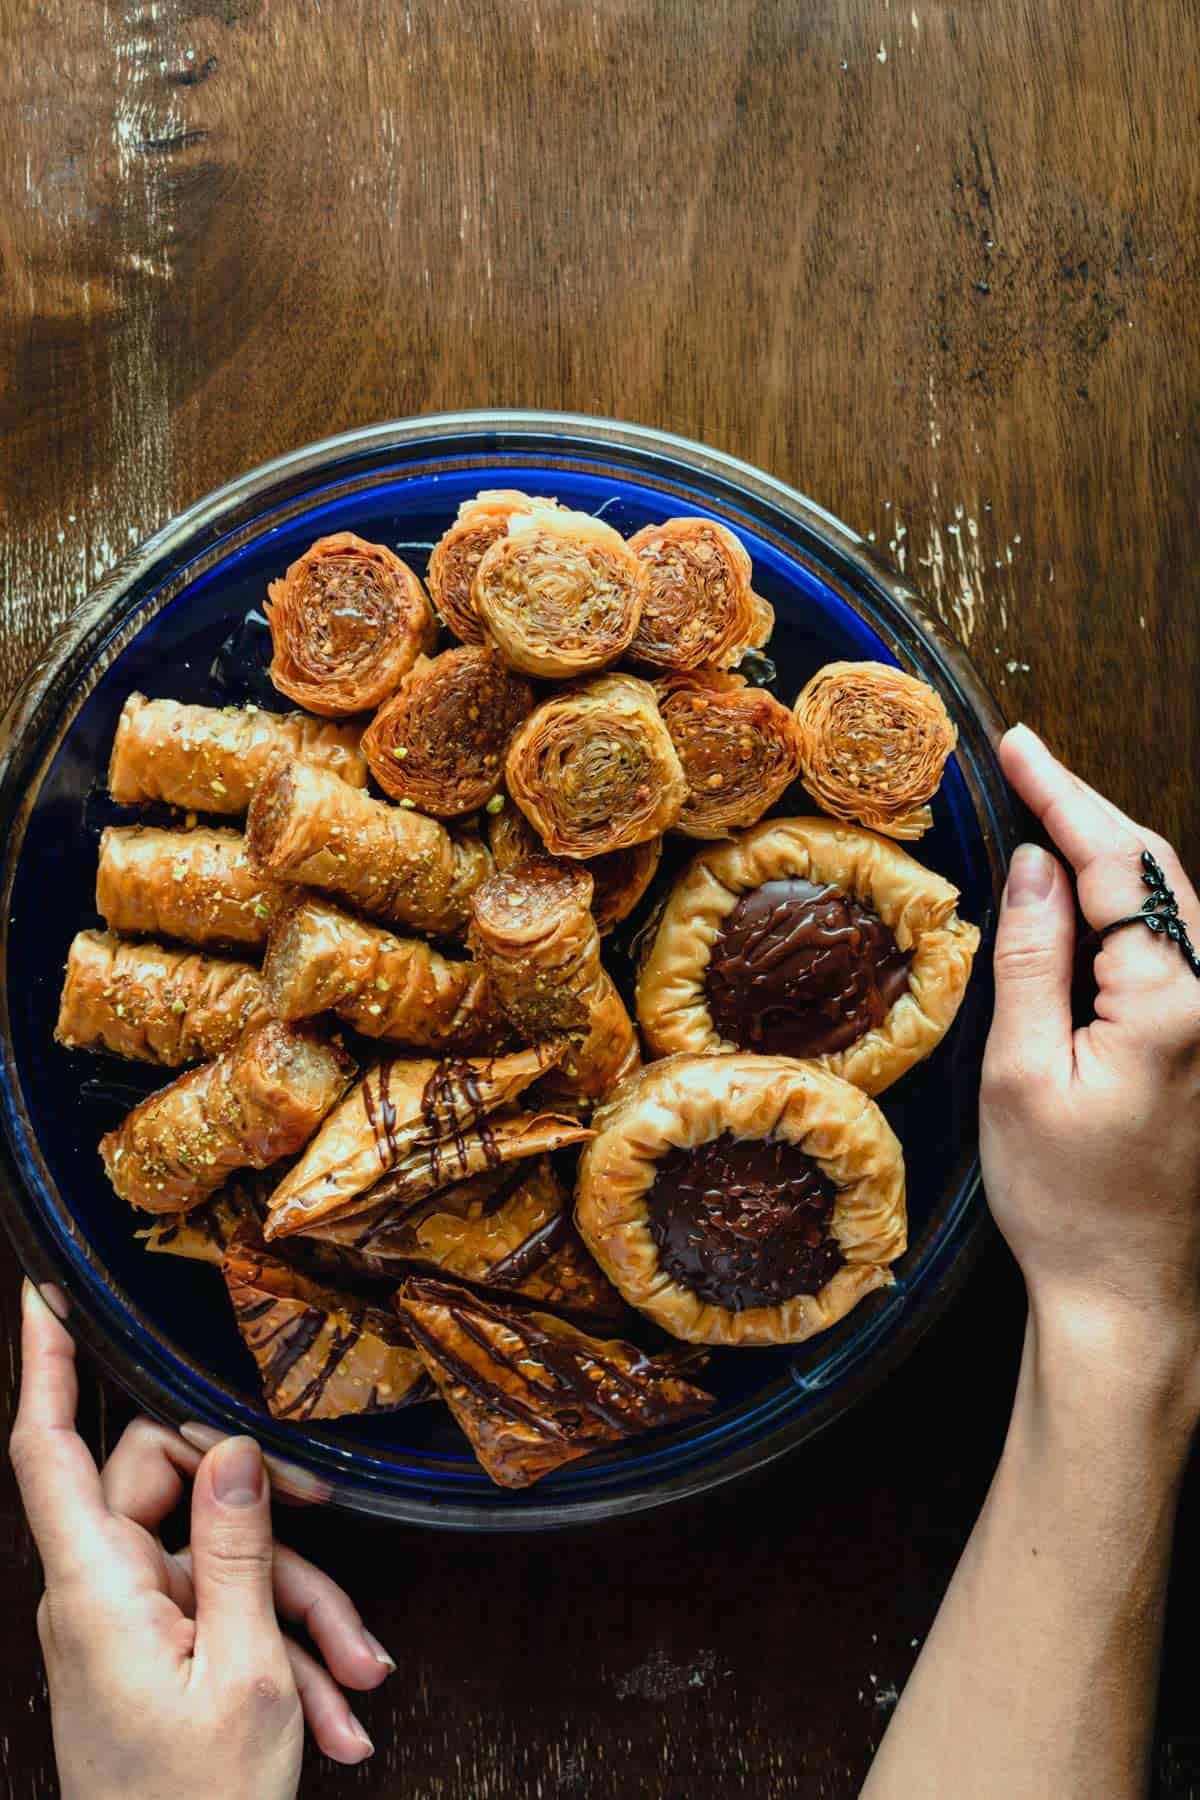
Now if you were to decide which one would you pick? I think that first, you have to try them all. Not that you'll be able to pick one above the others afterwards. But they're really all so good!
And I can't think of anything better to serve on a party or gathering. Just like I can't think of anyone who can say no to Baklava. These Mini Baklava's are also great to give as a gift as they won't spoil if stored at room temperature.
They're also much easier than they look to make. Just follow the tutorials with the picture instructions below and it will be a piece of cake.
How To Work With Filo
If you are not familiar with using filo dough, there is really no need to worry about it. Filo is very easy to handle as long as you keep in mind these two things.
1.) Filo air-dries. As long as you keep it covered it will keep soft and flexible and won't tear easily when you work it. Simply remove as many sheets as needed to work with at a time and keep the remaining stack completely covered with a tea towel.
2.) Unfreeze properly. If you hurry up the process there is a chance that filo will stick together a bit here and there. The right way to do it is to let the filo unfreeze slowly in the fridge overnight. Then let the filo package at room temperature 30 minutes before using it. This way it will get to the right temperature without moisture getting locked inside it.
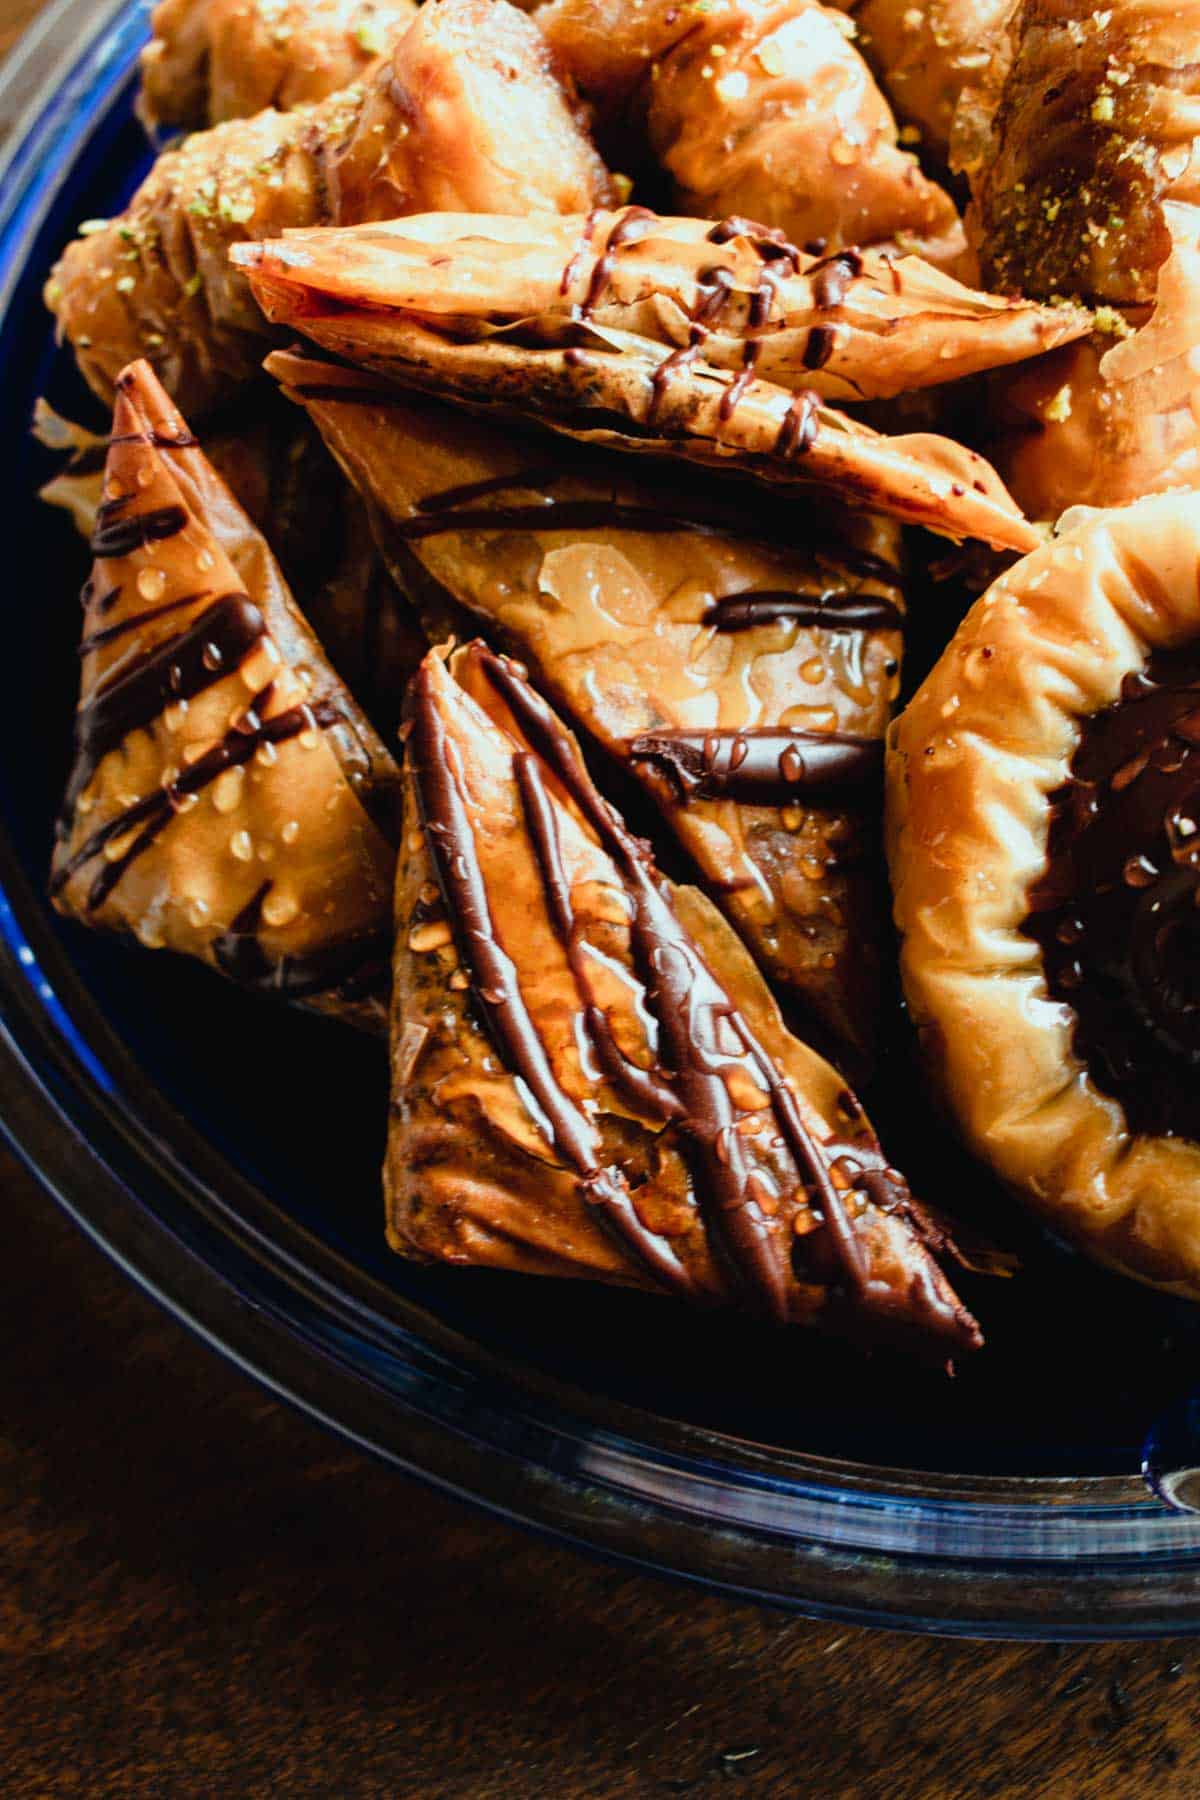
No.1 The Chocolate Baklava Triangles
If you like very flaky Baklava then this version is for you. Not too dense, and lighter on syrup. These Baklava triangles are filled with walnuts, almonds, and chocolate flakes.
You can even use your favorite chocolate to make these. I used my favorite one that's 70% cocoa and chopped it very finely so it won't tear the filo while folding. You may even use white chocolate if you wish. Just make sure white chocolate is a baker's chocolate since white chocolate is much more sensitive to heat.
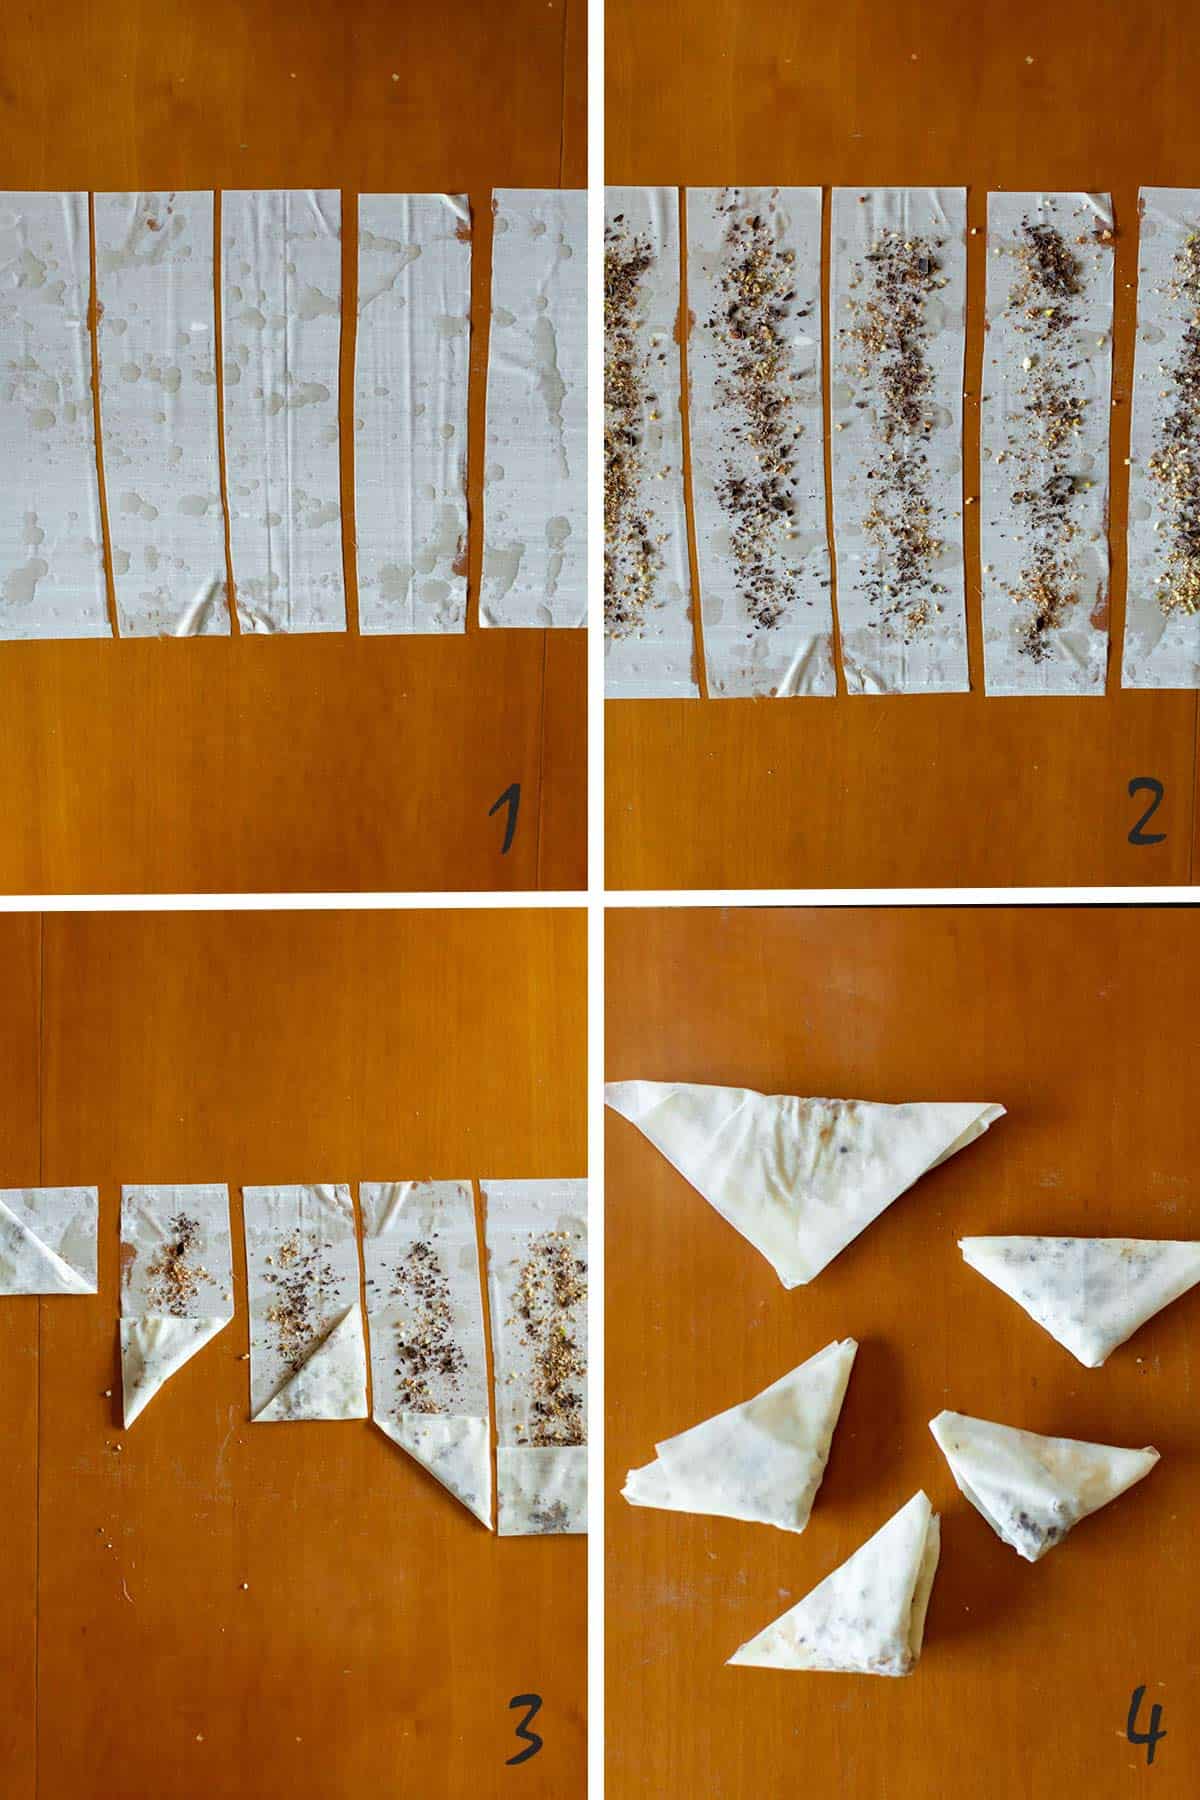
- Place filo on your working surface facing it widthwise. Drizzle with butter. Cut into 5 equal long strips.
- Sprinkle the nuts and chocolate mostly in the center.
- Start folding. First, overlap the bottom edge. Then overlap the folded edge in order to create a triangle. Move upwards folding this way.
- Fold the triangle in half to create a smaller one.
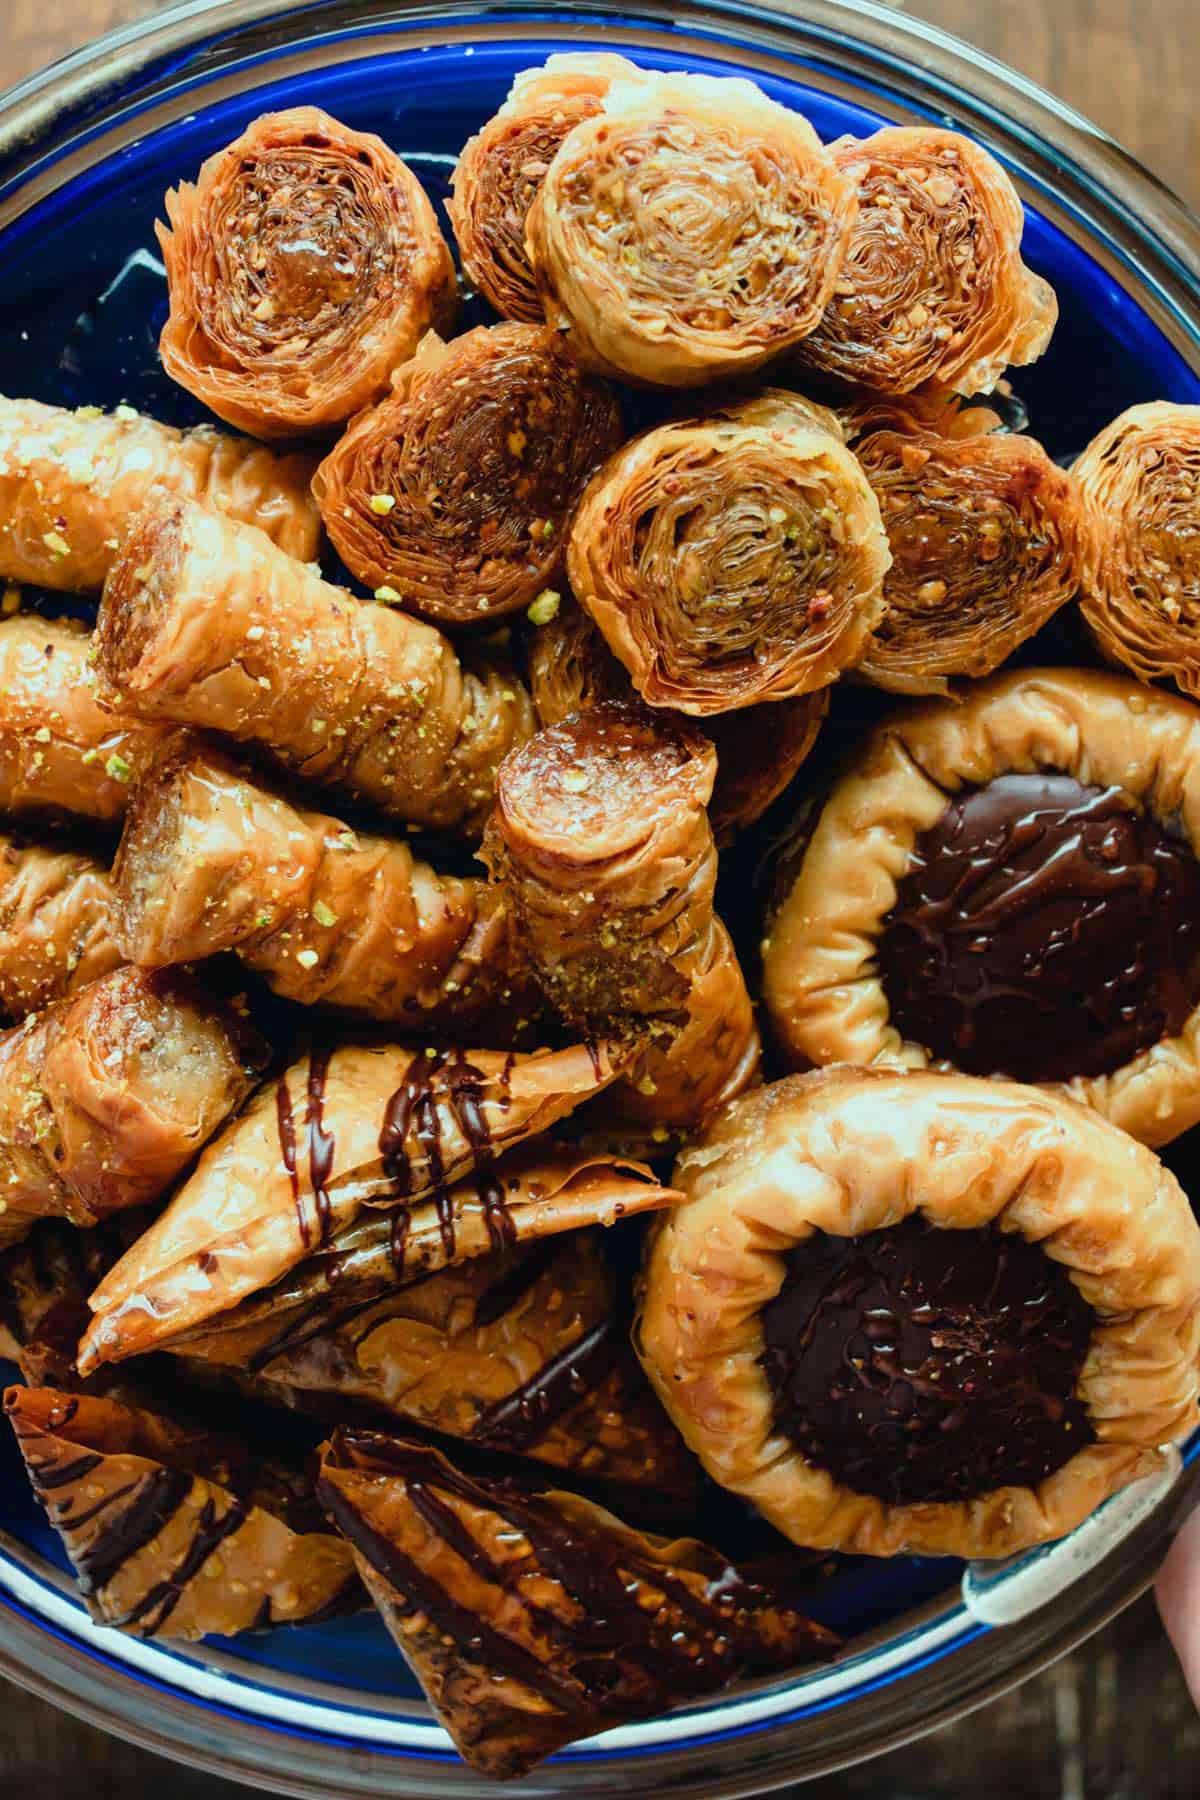
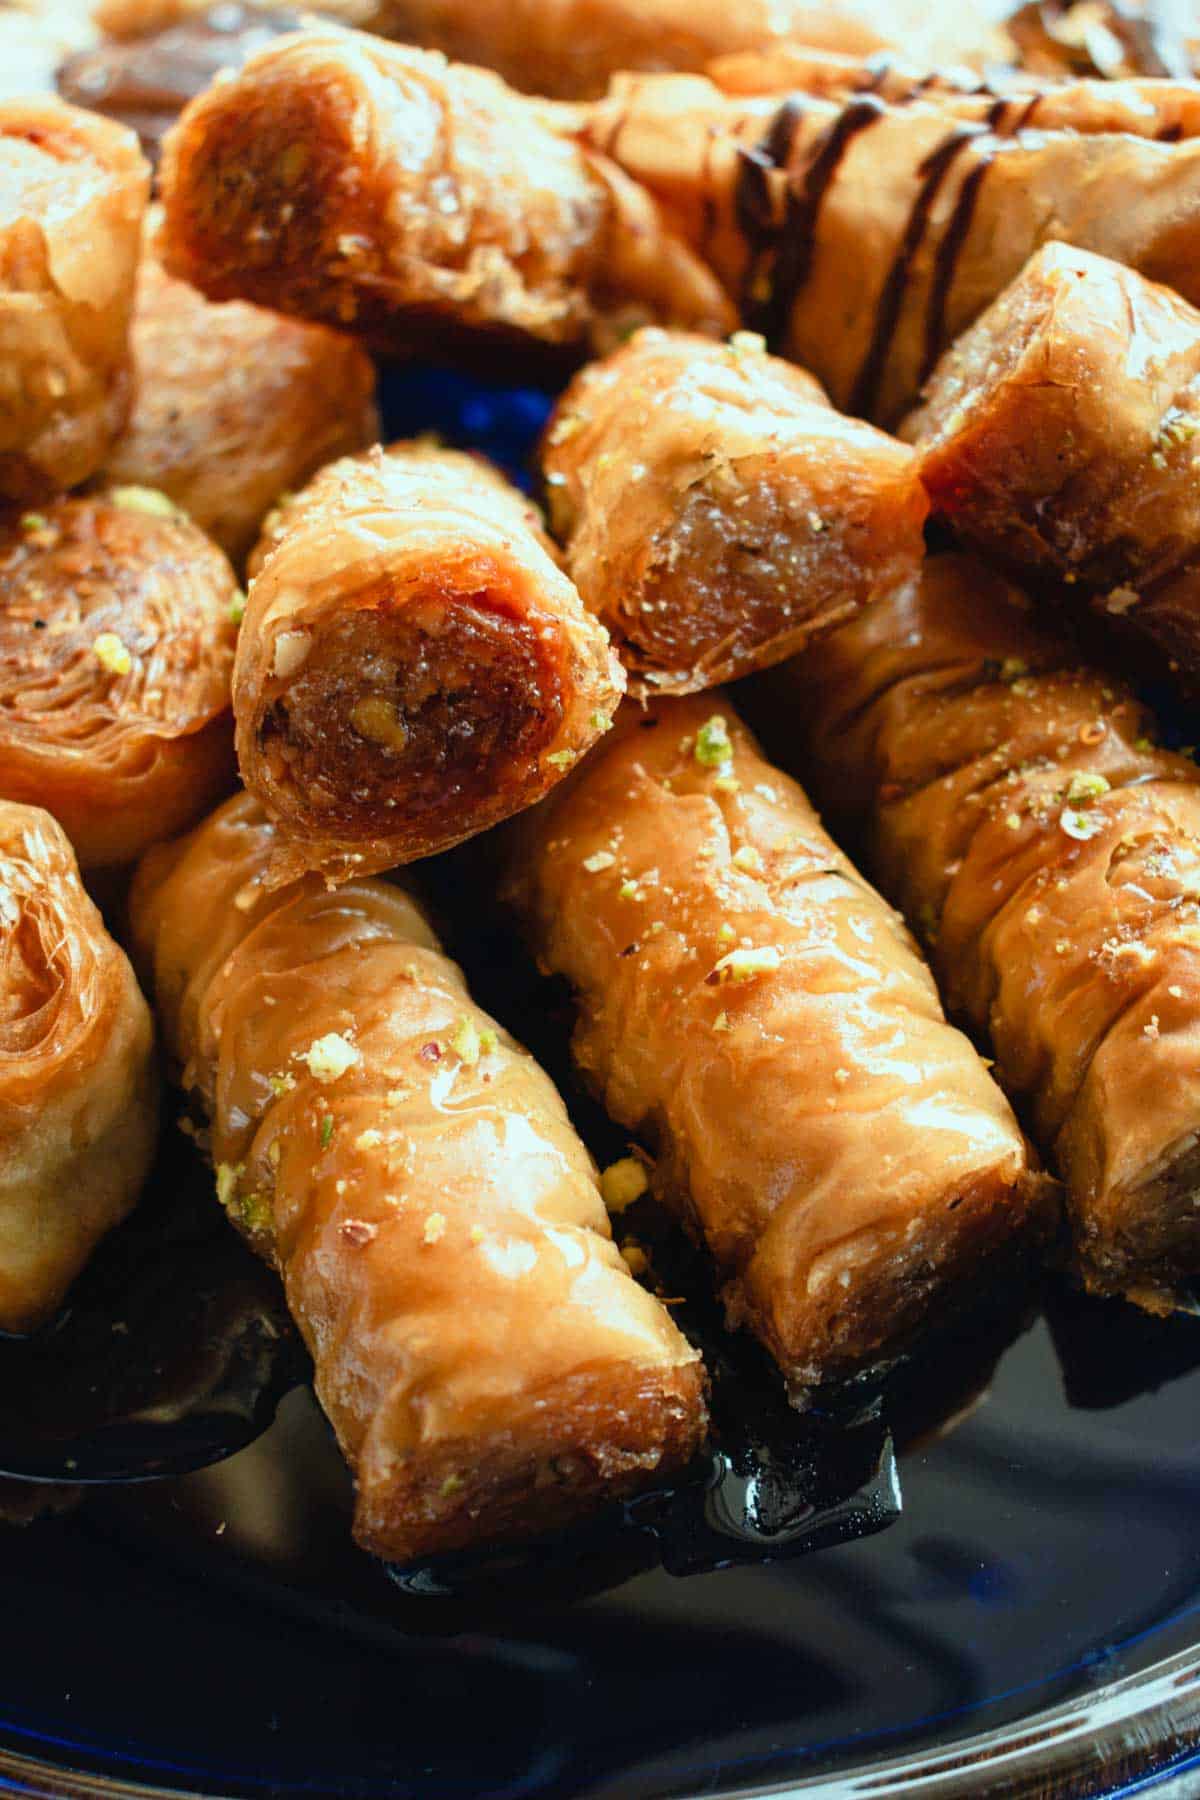
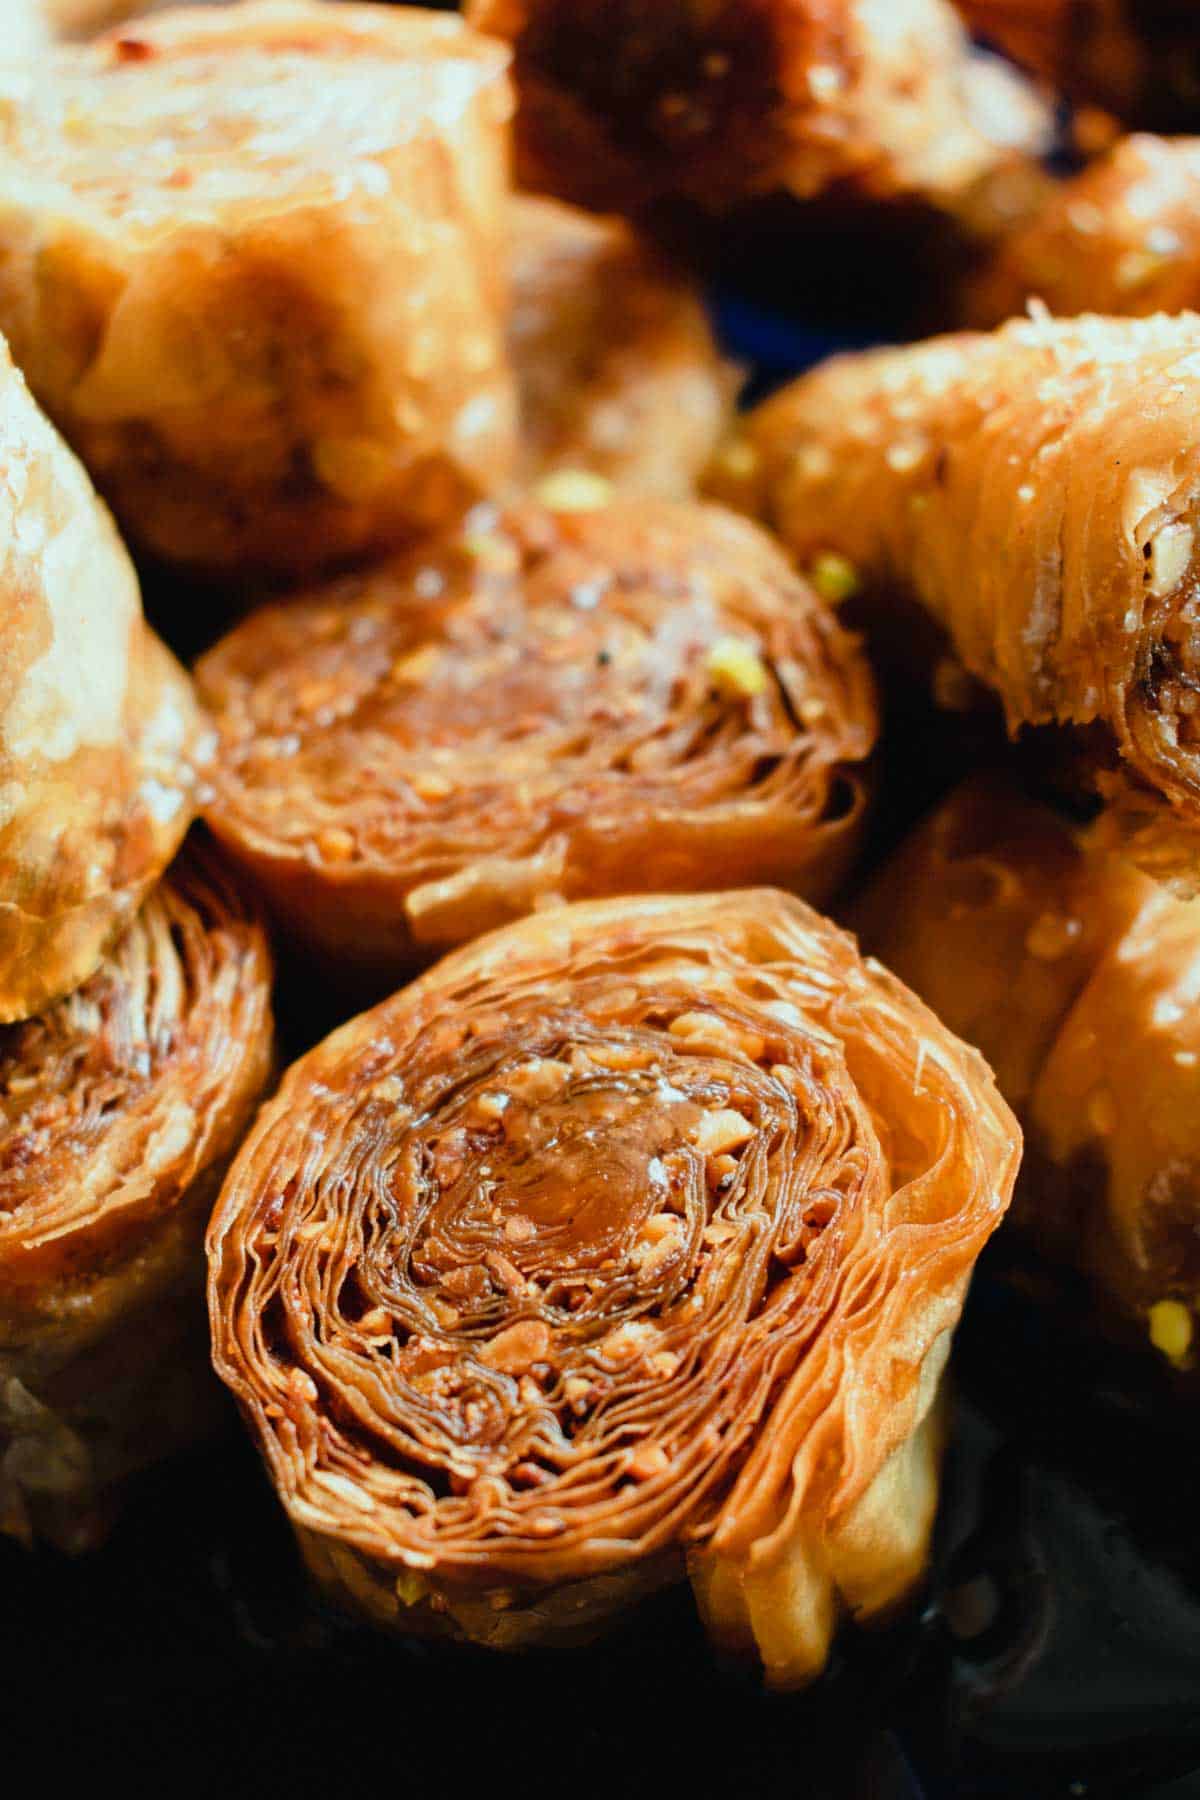
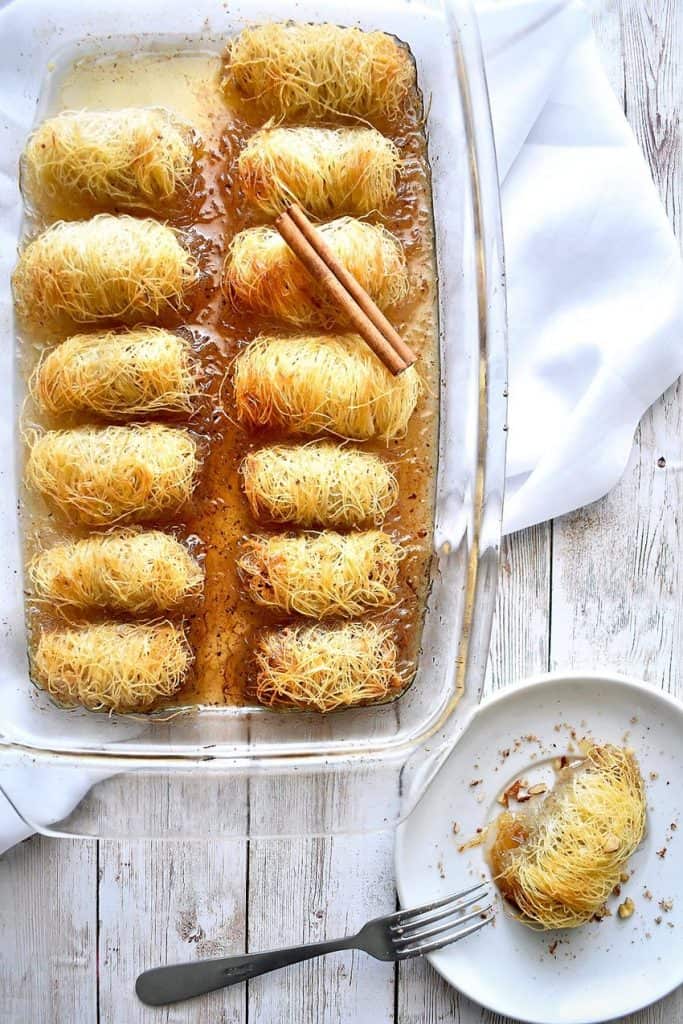
No.2 The Baklava Rolls
This version of mini Baklava is so crunchy, with a softer syrup-soaked center that's filled with an assortment of walnuts, almonds, and pistachios.
For these Baklava's you will need a long knitting needle (40cm) in order to roll them and make them ruffly. You may use two long skewers instead. One on each side of the filo.
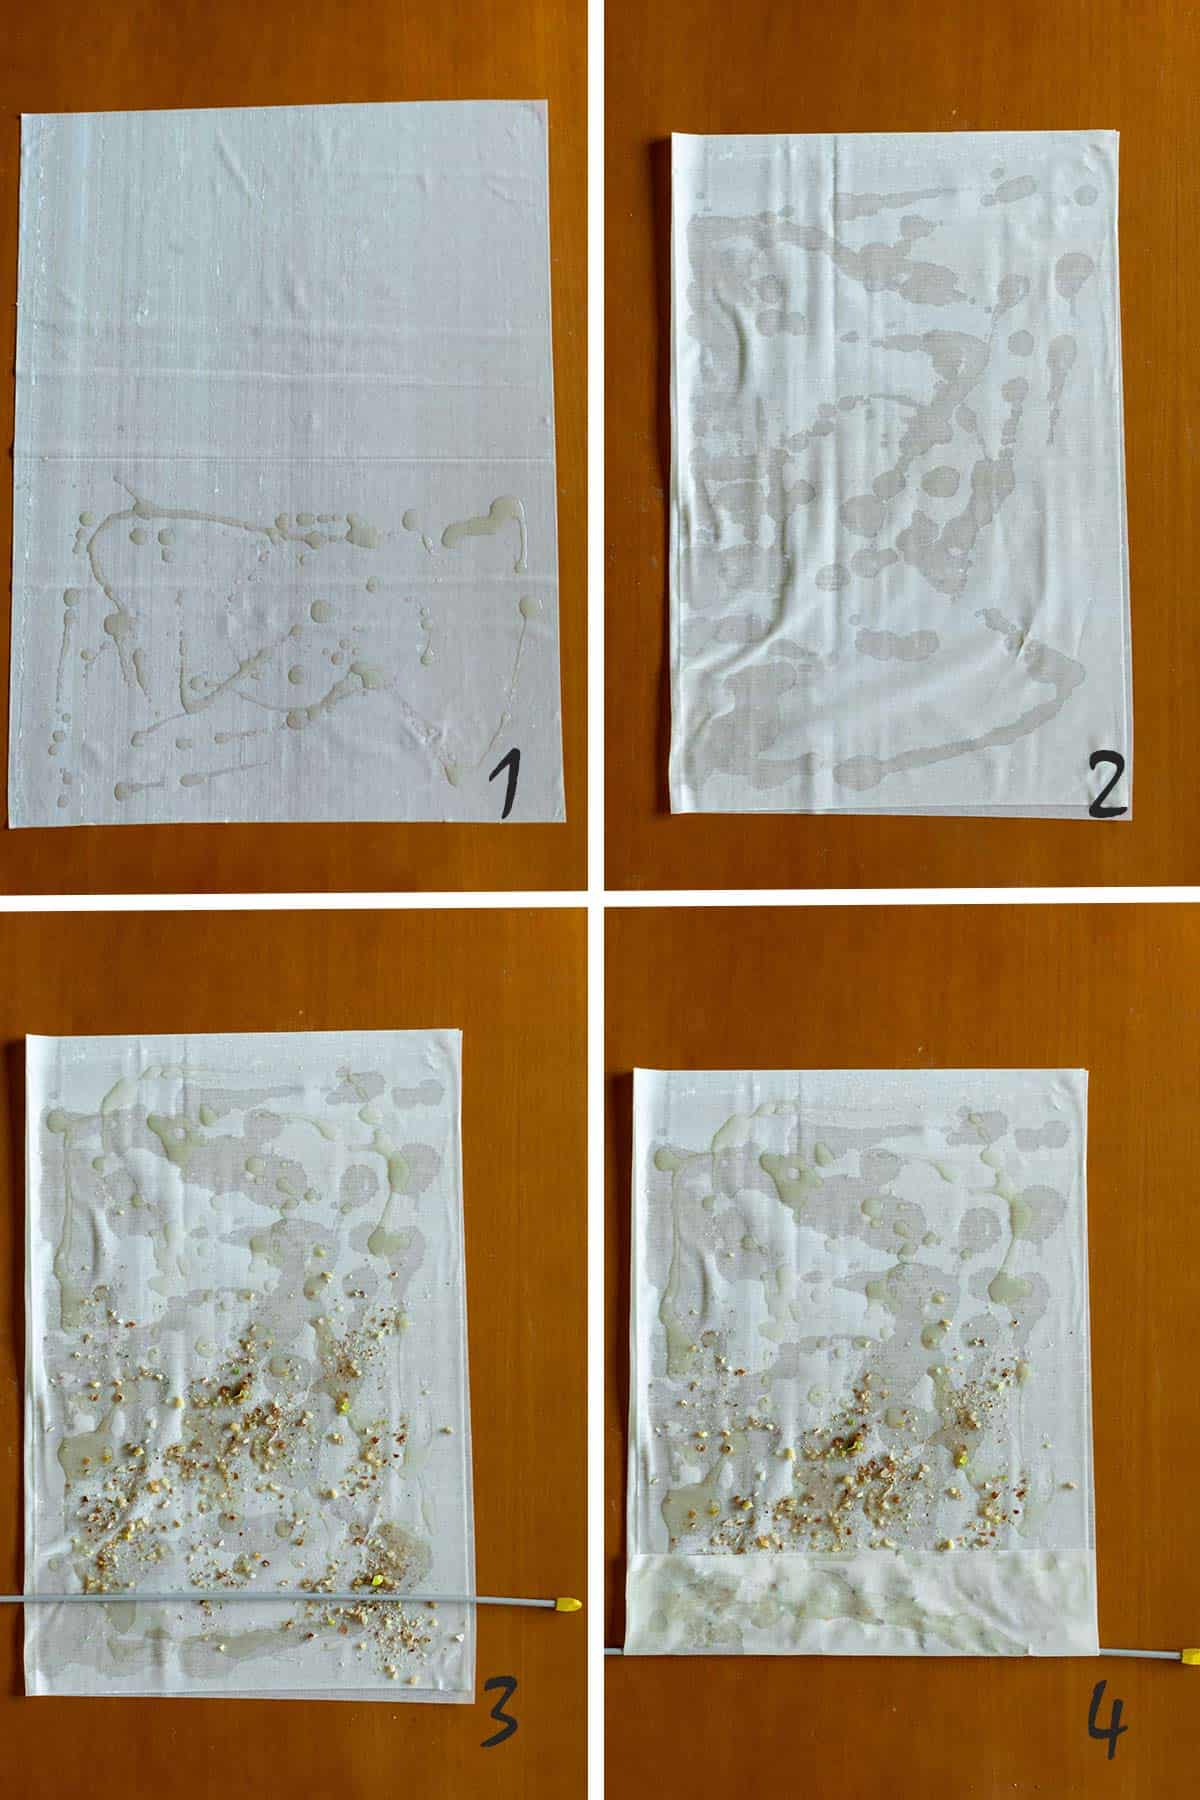
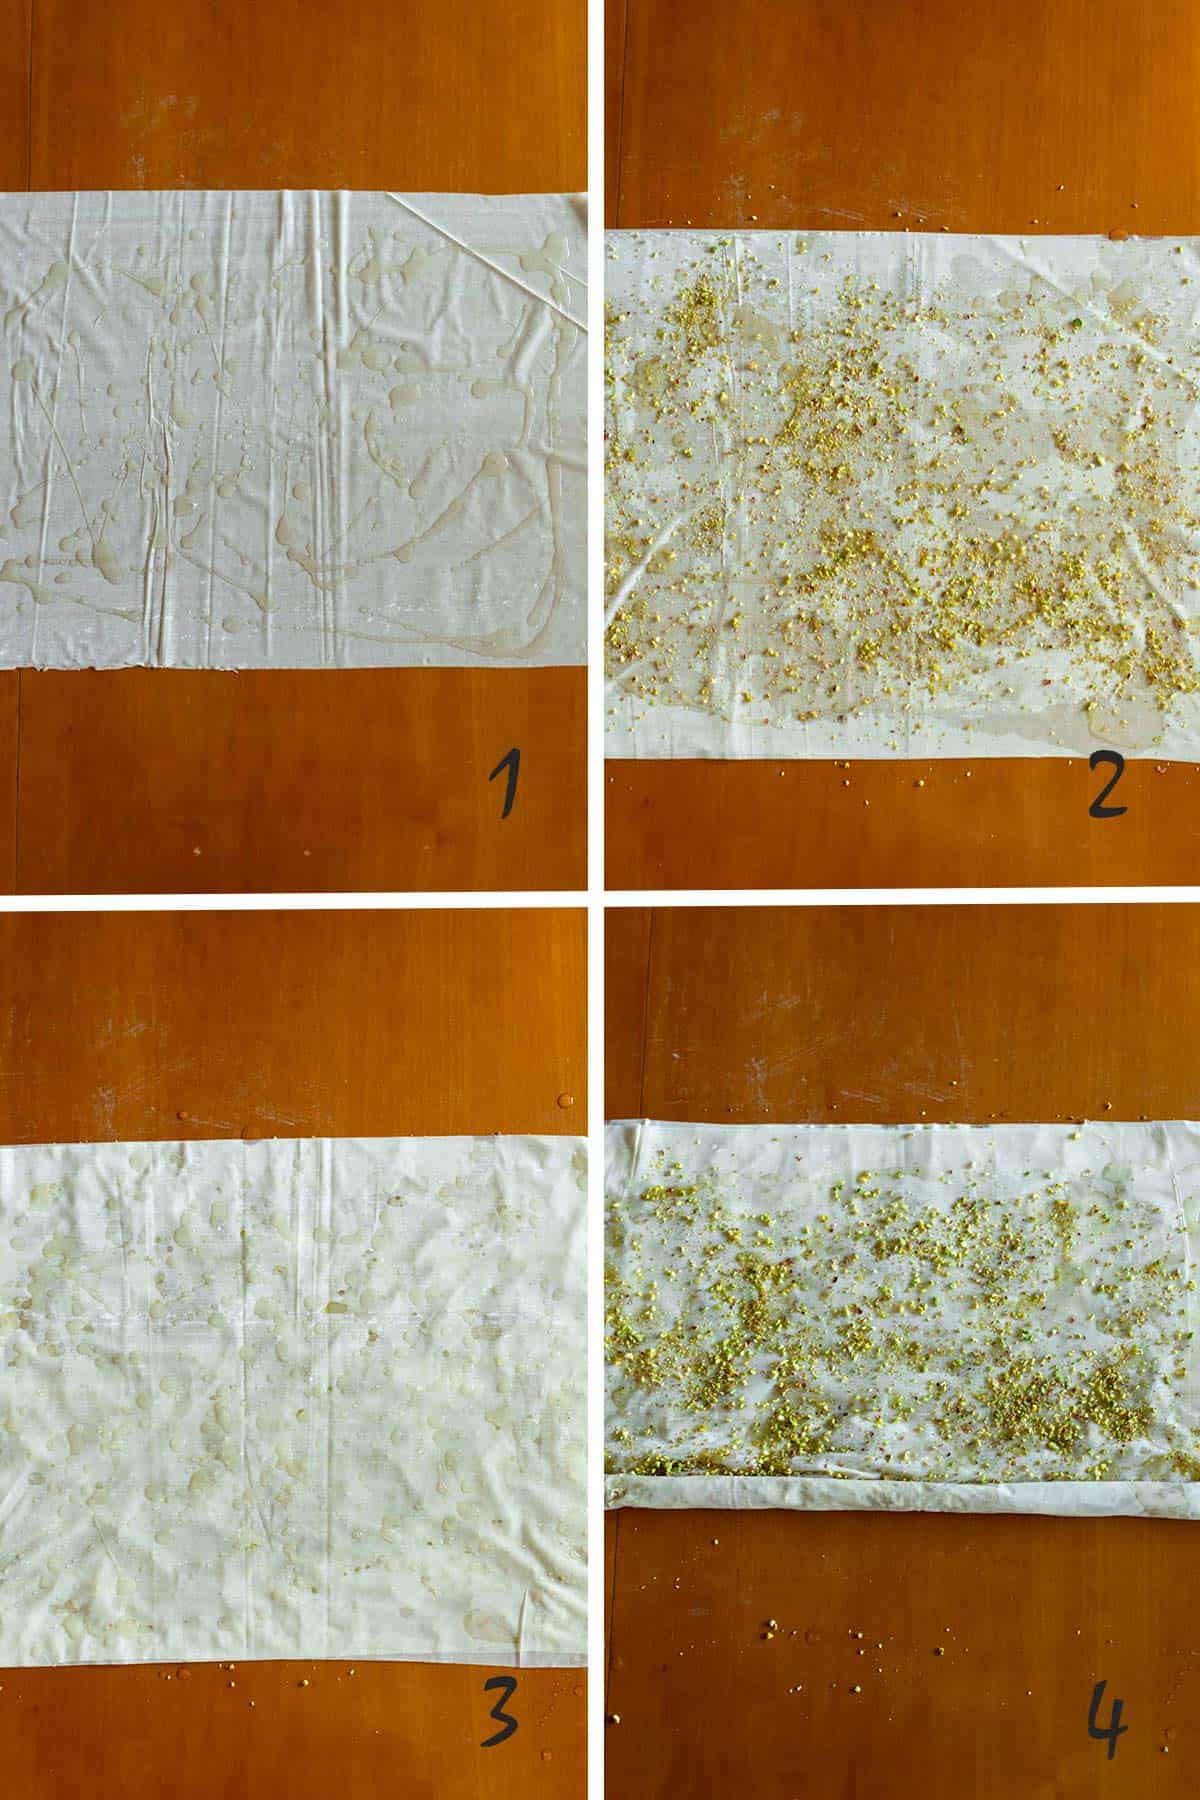
- Place two filo sheets on your working surface (facing them lengthwise) drizzled with butter in between and on top. Sprinkle some of the nut filling on the top filo. Place the needle on the bottom edge leaving 4 cm space from the bottom.
- Overlap the bottom edge over the needle.
- Roll all the way up.
- Press inwards on each side to ruffle the roll and then pull out the needle.
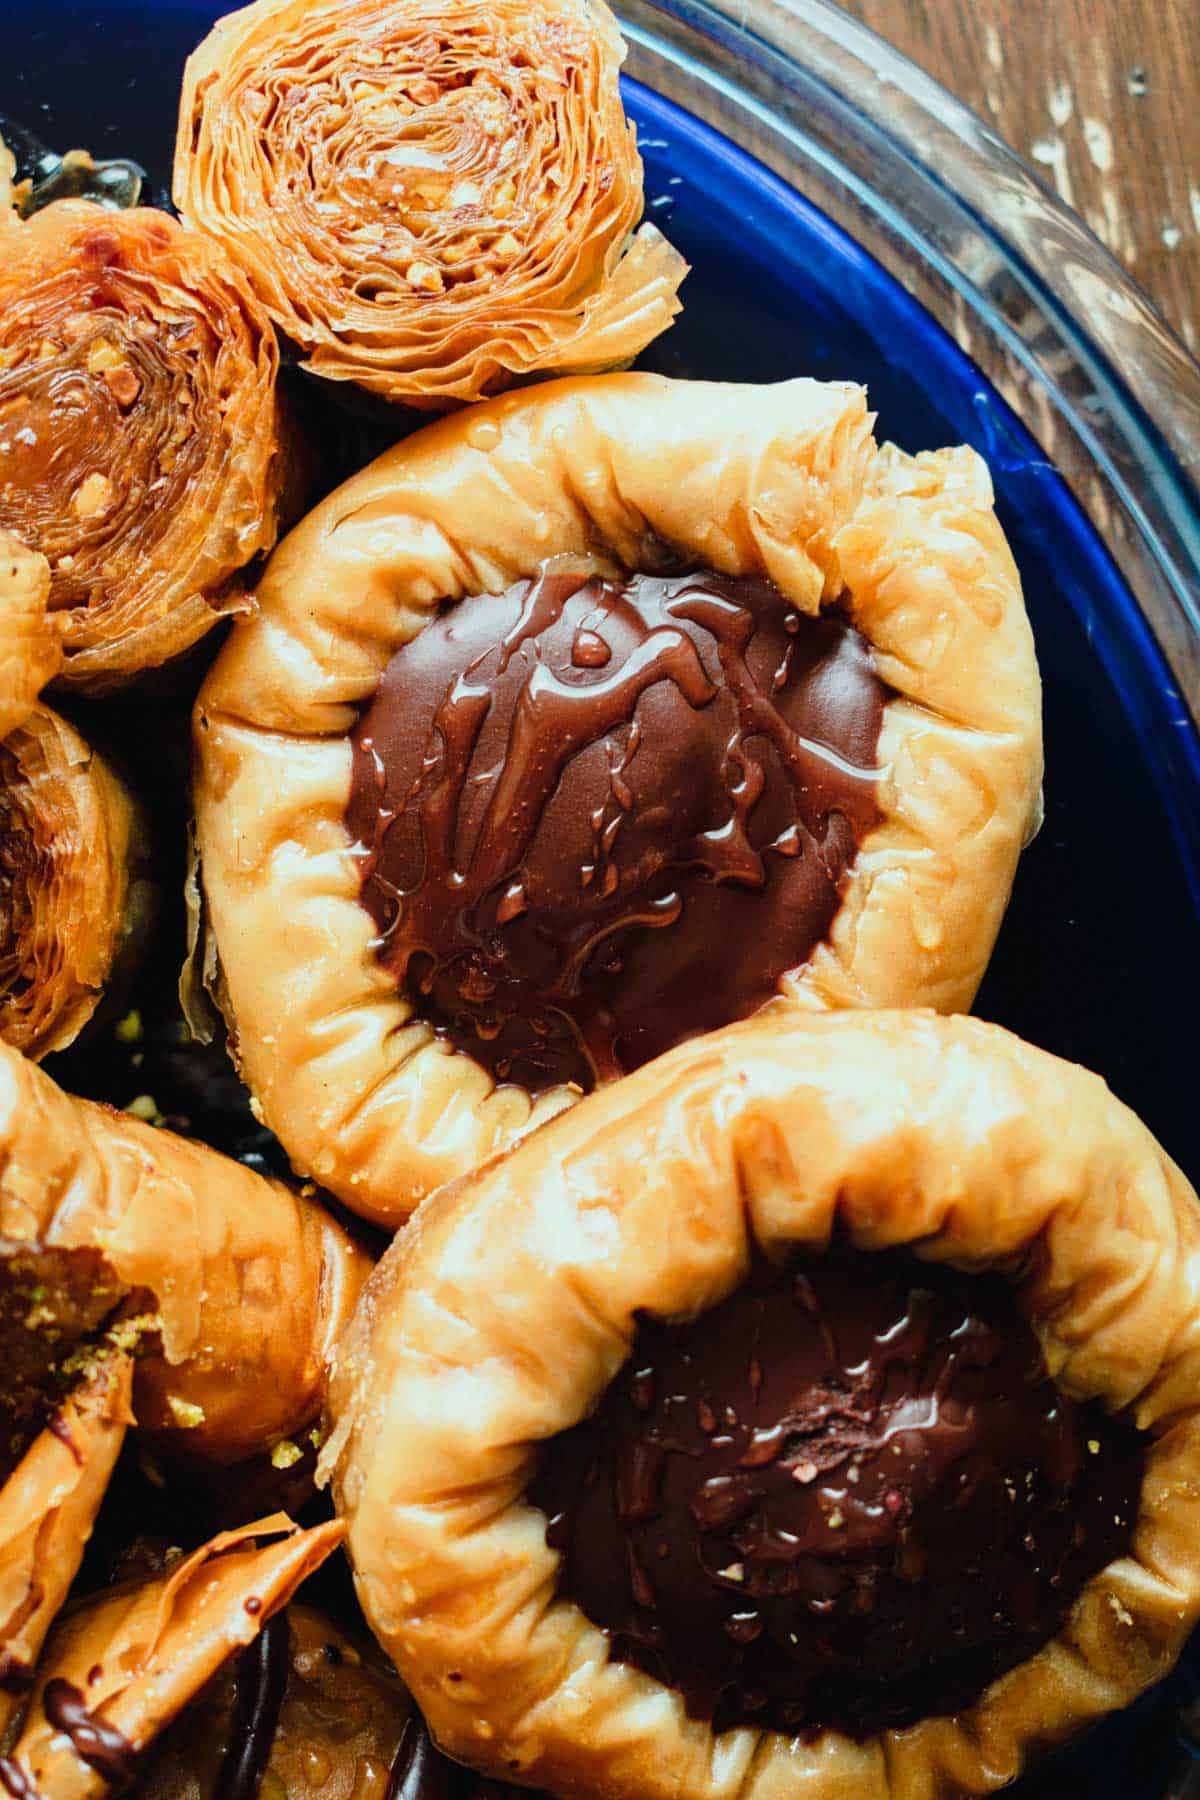
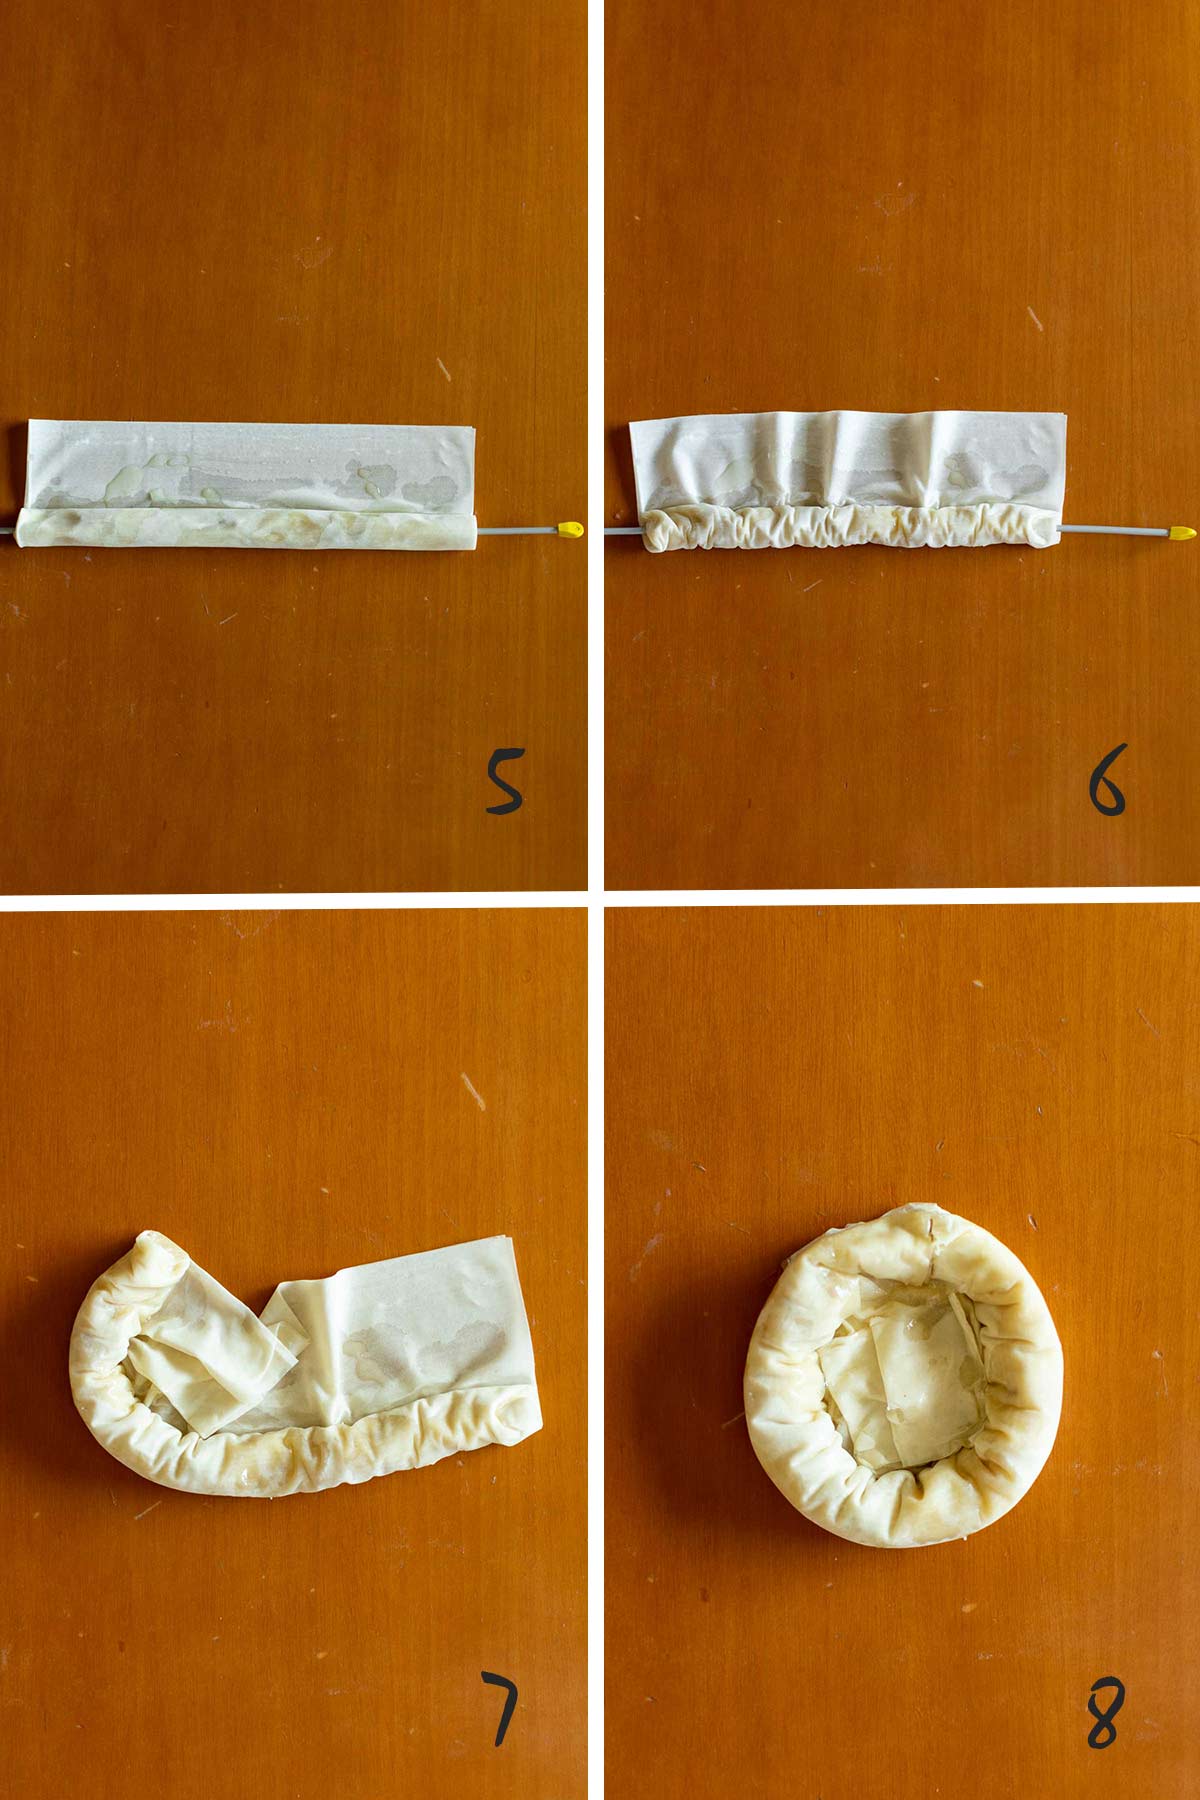
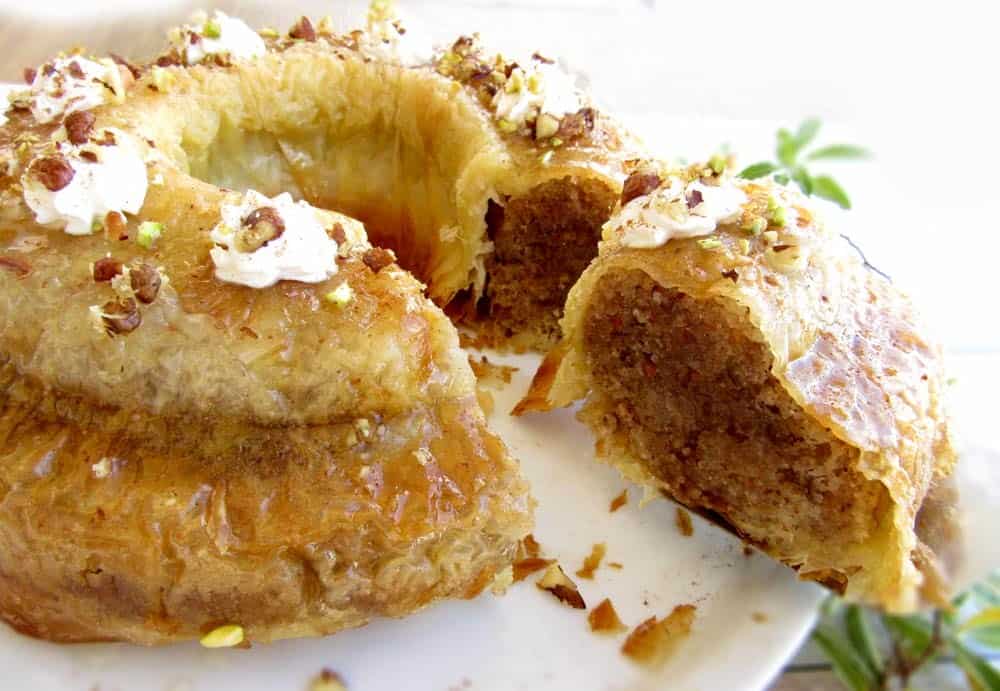
No.3 The Chocolate Baklava Nests
These Baklavas are for true chocolate lovers. They're so chocolatey and divine in flavor. For best results use baker's chocolate for the filling. You will also need a knitting needle for this recipe or two skewers one on each side (see tutorials below).
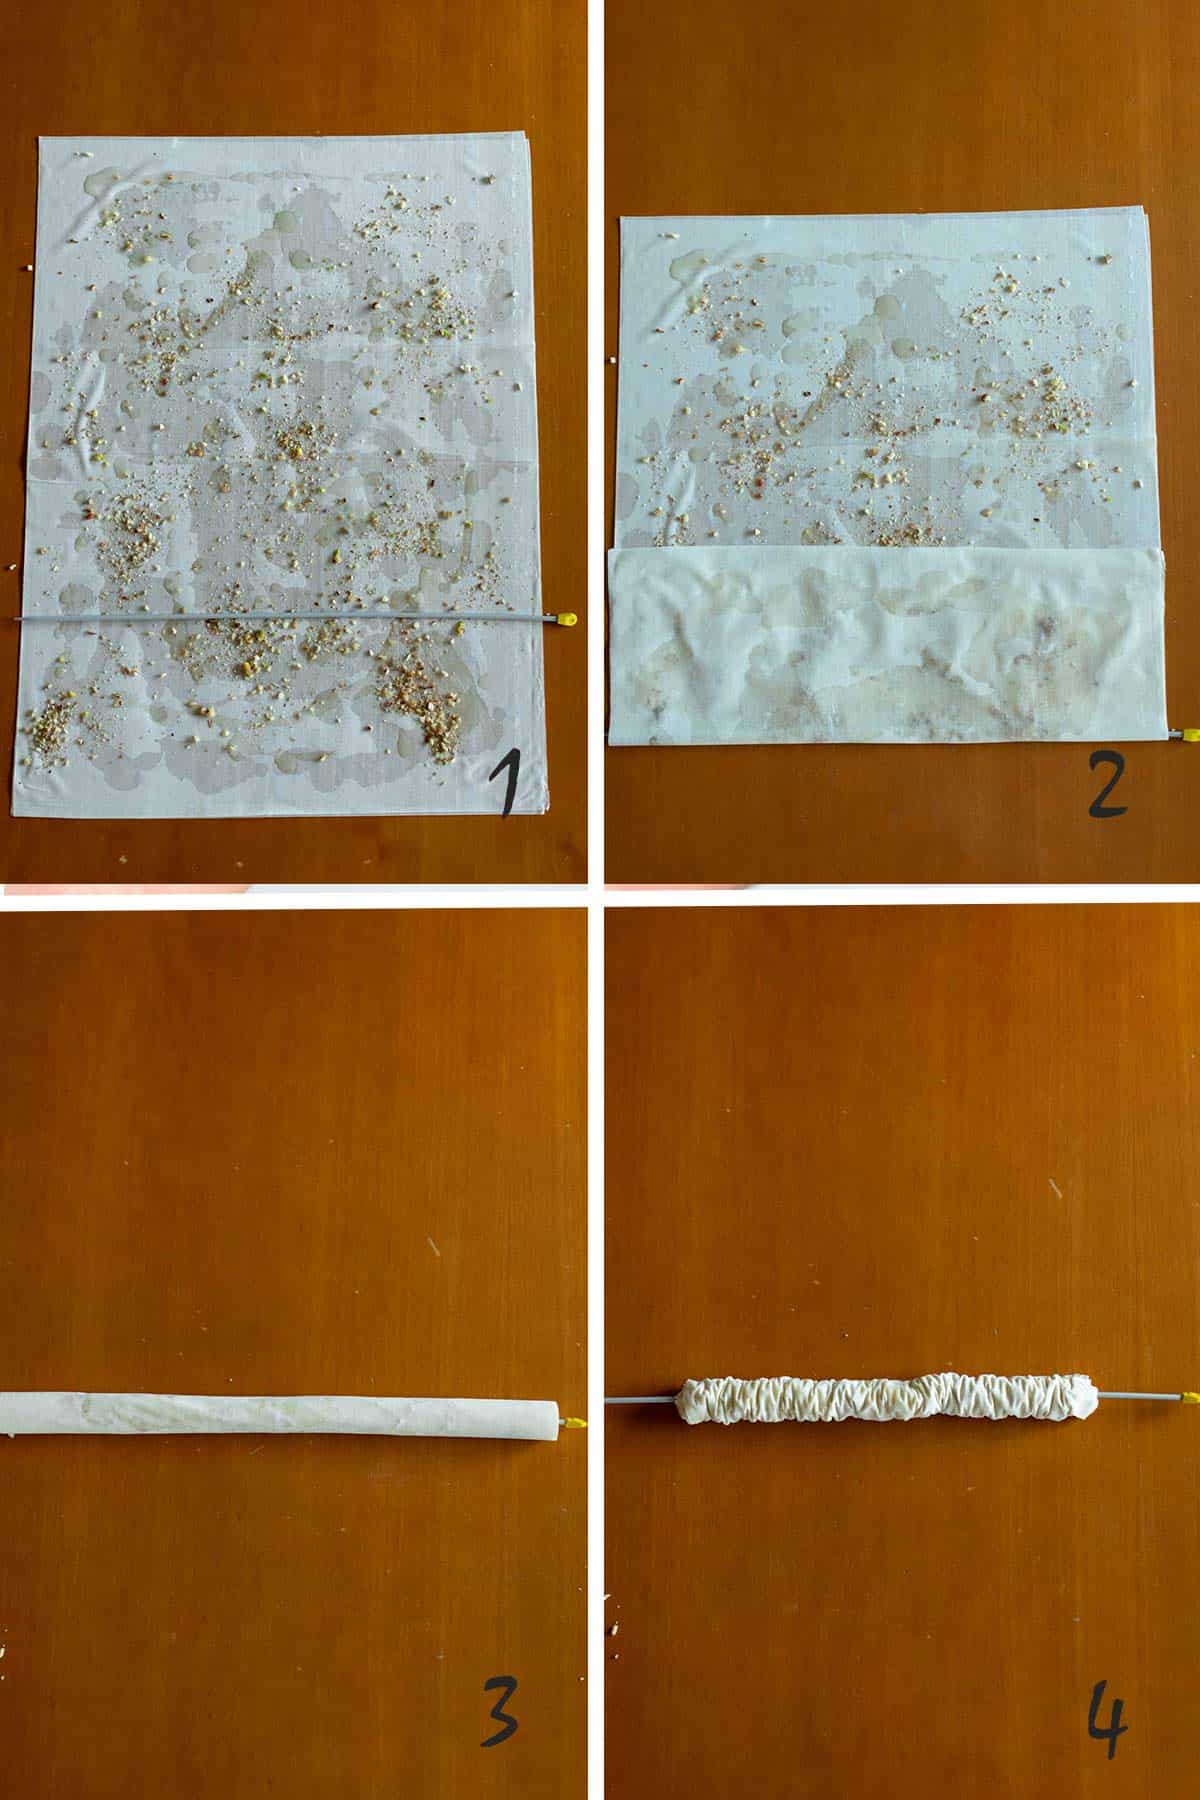
- Place one filo sheet on your working surface facing it lengthwise. Drizzle the bottom half with butter.
- Fold the filo in half and turn it to face its longer side. Drizzle with butter and sprinkle the bottom half of the filo with the ground nuts. Place the knitting needle 4 cm away from the bottom edge.
- Overlap the bottom edge over the needle.
5. Start rolling upwards until you reach 5 cm from the end of the filo.
6. Press the roll on each side to ruffle it. Remove the needle.
7. Roll inwards to create a nest.
8. Press the filo to stick together and create a flat bottom for the chocolate to sit in. Use some melted butter if needed to help it stick together.
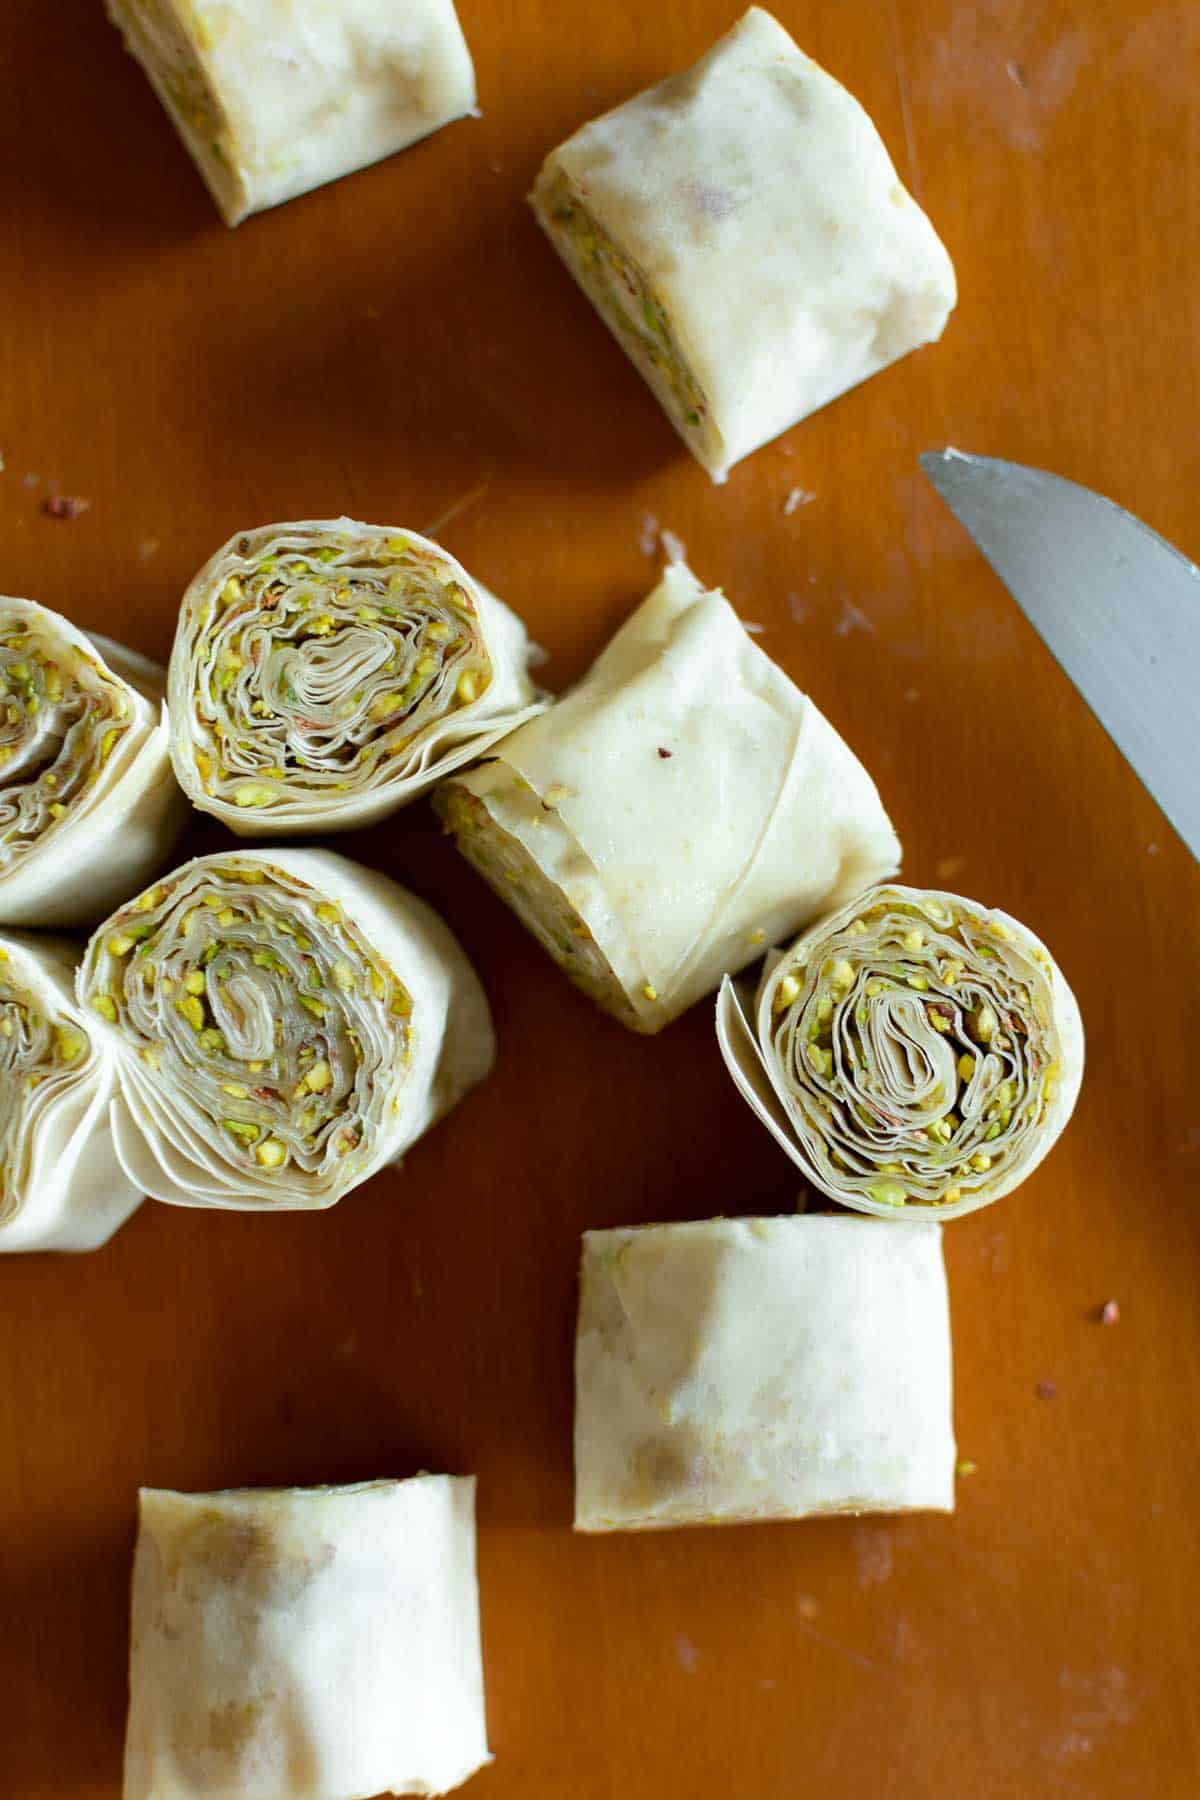
No.4 The Rolled Pistachio Baklavas
These are one of the easiest and quick to make. So if you want a really quick and crispy Baklava go for this version of Pistachio Baklavas.
- Lay a filo sheet on your working surface and drizzle with butter.
- Place another filo on top. Drizzle with butter again and sprinkle the nuts on top.
- Place another filo on top. Drizzle with butter.
- Place one more filo on top, drizzle with butter, and sprinkle some nuts. Repeat this process until you use all of the remaining filo (see recipe below).
Cut the long roll into small 2.5 cm pieces. Make sure you place in the pan close to each other so they won't unroll while baking.

Baking The Baklavas
All the Baklavas are baked the same way. So if you wish to try all four versions you can bake them together in one or two pans. Just make sure that the Rolled Baklavas (No.2) fit exactly into the pan so they will keep their shape. So either bake these separately in a small pan or baking dish that's 30 x 20 cm (12 x 8-inch) or use a pan that's 30cm (12-inch) in width. So you place the rolls in the one end of the pan to fit and hold together.
About The Syrup
The syrup is also the same for all of the above versions of Baklava. Made with the same ingredients and in the same quantity. So again, if you wish to make all of the four versions, you can simply multiply the syrup ingredients by four (no need to do this with the orange peel and cinnamon stick) and make the syrup all in one big pot.
Recipe
Easy Mini Baklava (4 different ways)
Ingredients
For The Chocolate Baklava Triangles: (yields 30 mini triangles)
- ½ package filo dough (6 sheets)
- 35 grams / 1.2 oz walnuts
- 35 grams / 1.2 oz almonds
- ⅔ teaspoon ground cinnamon
- a pinch ground cloves
- 65 grams / 2.3 oz dark chocolate flakes small
- 125 grams / 4.4 oz butter
- OPTIONAL: 50 grams / 1.7 oz dark chocolate drops or chopped baker's chocolate (to decorate on top)
For The Ruffled Baklava Rolls: (yields 20)
- 1 package filo dough (450 grams)
- 125 grams / 4.4 oz walnuts
- 60 grams / 2.1 oz pistachios
- 60 grams / 2.1 oz almonds
- 225 grams / 7.8 oz butter
- TOOL NEEDED: knitting needle or two long skewers
For The Chocolate Baklava Nests: (yields 6)
- ½ package filo dough (6 sheets)
- 50 grams / 1.7 oz either walnuts, almonds, pistachios, or a mix of 1 or more of these nuts
- 125 grams / 4.4 oz butter
- TOOL NEEDED: knitting needle or two long skewers
For The Chocolate Filling:
- 100 grams / 3.5 oz dark chocolate drops or bakers chocolate cut into small pieces
- 50 grams / 1.7 oz butter
For The Rolled Baklavas: (yields 15 bite-sized rolls)
- ½ package filo dough (6 sheets)
- 75 grams / 2.6 oz pistachios
- ½ teaspoon ground cinnamon
- 125 grams / 4.4 oz butter
For The Syrup: (it's for one batch of either one of the above Baklava's, multiply by 4 if you're to make all 4 variations)
- 150 grams / 5.3 oz sugar
- 120 grams / 4.2 water
- 1 tablespoon honey
- 1 stick of cinnamon
- 1 orange peel
- 1 teaspoon freshly squeezed lemon juice
Instructions
Prepare The Filo Dough:
- To unfreeze the phyllo properly, leave it in your fridge overnight. Then leave at room temperature in its package for about 30 minutes before using. This way it will be much easier to handle.
- You may then open the package and take out as much filo as needed. For example, remove half of it (6 sheets) and then roll the remaining filo as it was, and place it back in its package. Or simply fold it and place it on a plate and cover the plate with plastic wrap. Either way, make sure it's airtight so it won't air-dry. This way you may store the filo in your fridge for up to a week and use any leftover to make other things such as this delicious Feta Wrapped In Filo (only one sheet needed).
Prepare The Syrup:
- The syrup is just enough for one batch of either one of the Baklavas. If you want to make all 4 of the different Baklavas then multiply the ingredients for the syrup by 4. Note: You don't need to add 4 peels of orange or 4 sticks of cinnamon. 1 stick of cinnamon and 1 orange peel is enough to flavor all 4 mini Baklavas. Prepare The Syrup Before Making The Baklavas: The syrup has to be luke-warm when you pour it over the hot Baklava.
- To make the syrup, add all of the ingredients for the syrup in a cooking pot and heat over high heat. Once it starts to boil, reduce heat to medium-low and simmer uncovered for about 8-10 minutes until it gets to a syrupy consistency. Remove from heat and set aside.
Baking The Baklavas:
- All of the following Baklavas are baked the same way. First, preheat the oven at 180°C /356°F. Bake the Baklavas for 30 minutes until deep golden on top. Then cover the pan with aluminum foil and bake for another 30 minutes. This way the Baklavas get really crispy without getting burned.
To Make The Chocolate Baklava Triangles:
- Melt the butter over low heat and then set aside.
- Add the walnuts, almonds, cinnamon, and cloves in a blender and blend until almost powdered.
- Take one filo sheet and place it on your working surface. Cover the remaining stack with a tea towel so it won't air-dry.
- Drizzle the filo sheet with some melted butter (no need to brush it all over). Then take a sharp knife and cut the filo into 5 equal strips.
- Sprinkle some of the nut mix on each strip (leaving just a hint of space on the edges so it won't come out when you fold them).
- Then sprinkle some of the chocolate flakes the same way.
- Start folding each strip. First overlap the bottom edge into a square shape and then proceed on folding triangularly towards the end. See the picture tutorial above.
- Gently press the triangles and then fold in half to create a smaller one. Repeat the process for the remaining filo. Then place in a small pan or baking dish and drizzle with remaining butter on top.
- Bake and then drizzle with the syrup once they get out of the oven. See baking and syrup instructions above. Decorate by melting 50 grams of dark chocolate either in a microwave or double boiler. Or use 2-3 spoonfuls of the filling used in the Chocolate Baklava Nests if you're making those as well.
To Make The Ruffled Baklava Rolls:
- Melt the butter and set aside.
- Add all of the nuts into a blender and blend until almost powdered.
- Take one filo sheet and lay it on your working surface facing it lengthwise. Drizzle with some butter here and there. Take another sheet of filo and place it on top. Drizzle with butter as well. Cover the remaining filo stack with a tea towel so it won't air-dry.
- Sprinkle some of the nut filling all over the top filo. Then take a long knitting needle and place it 4 cm from the bottom edge. You may use two skewers on each side instead if you don't have a knitting needle.
- Overlap the bottom edge over the needle and press gently. Start rolling towards the other end. Then press to stick. Push inwards on each side of the roll to give it a ruffled look. Then pull out the needle.
- Repeat the process for the remaining filo. Place the rolls in a 30 x 20 cm (12 x 8-inch) pan or baking dish. Then cut into 20 small rolls. Drizzle with remaining butter all over and bake as instructed above. Once they get out of the oven drizzle with the syrup on top.
To Make The Chocolate Baklava Nests:
- Melt the butter and set aside.
- Place nuts in a mixer and blend until almost powdered. Note: You may even use nuts such as pecans or hazelnuts for this version.
- Take one sheet of filo and place it on your working surface. Drizzle with butter and then overlap the left half in order to fold the filo in half. Turn to face the filo lengthwise.
- Drizzle with butter again and sprinkle some of the nut filling over the bottom half of the filo.
- Take a knitting needle (or two skewers) and place it 4 cm from the bottom edge of the filo. Overlap the edge of the filo over the needle and press to stick. Roll upwards until 5 cm left from the top edge.
- Press the roll on each side to ruffle it and then pull out the needle. Roll inwards to create a circle. Press the excess phyllo downwards to create a flat bottom for the nest. If it doesn't stick easily use some of the melted butter.
- Repeat the process for the remaining filo to make 5 more nests. Then place in a pan or baking dish and drizzle with the remaining butter on top. Bake following the instructions given above. Then drizzle with the syrup right as they come out of the oven.
- Let the Baklavas reach room temperature and then prepare the chocolate filling. Add the chocolate and butter into a microwave-proof bowl, cover with plastic wrap, and melt over medium heat. Stir every 30 seconds, until chocolate has melted completely. Or use a double boiler instead. Pour the melted chocolate in the center of each nest and let it cool at room temperature. Note: You may keep 2-3 spoonfuls of the melted chocolate to drizzle over the chocolate Baklava triangles if you're making those as well.
For The Rolled Baklavas:
- Melt the butter and set aside.
- Add the pistachios and cinnamon in a blender and blend until almost powdered.
- Take one sheet of filo and place it on your working surface, facing it widthwise. Drizzle with butter and then add another filo sheet on top.
- Drizzle with butter again and sprinkle some of the nut mix all over.
- Place another filo on top and drizzle it with butter. Then place another filo on top and drizzle with butter and sprinkle some of the nut mix. Repeat this process one more time.
- Roll from the bottom up as tightly as you can. You may use some butter to help the filo stick together wherever needed.
- With a sharp knife cut the filo roll into 2,5 cm thick rolls. Place in a small pan or baking dish close to each other so they won't unroll. Drizzle with the remaining butter and bake. Then drizzle with syrup once they come out of the oven. Syrup and baking instructions are given at the top of the recipe.
Nutrition
YOU MAY ALSO LIKE...


Love me some Baklava! Better than my recipe!
Thank you Stephen 😀